Coning is a characteristic of a rotary table that can cause errors in inspection by increasing axial and radial runout values. The larger the part, the greater the impact of coning. Consequently, minimal coning is highly desirable when using a rotary instrument.
Of course, like any characteristic that can cause error, it is impossible to completely eliminate. The objective when manufacturing any product is to minimize error and be as close to either nominal value or zero (in the case of error) as possible.
The cause of coning
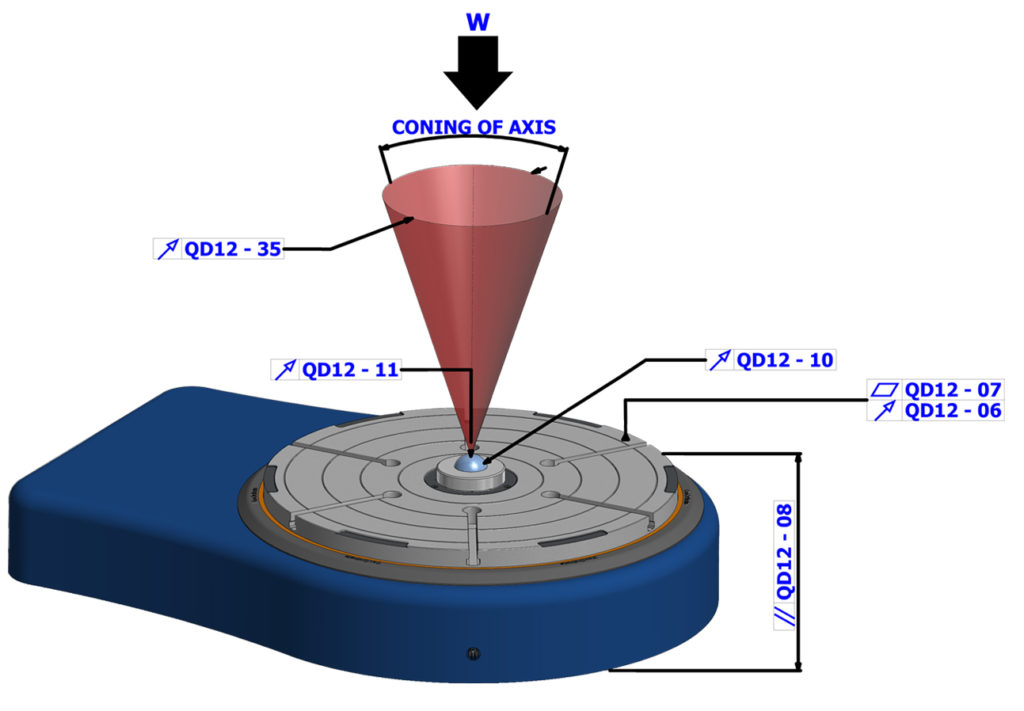
Coning is caused by the central axis of the point of rotation on a table not being perfectly perpendicular to the horizonal axis. As such, this causes a movement in the center point as you project upwards from the base of the table – causing an error that looks cone-like in appearance (hence the name).
This can be understood more easily by referring to the imagine below, where the effect is illustrated in red.

As mentioned above, it’s impossible to eliminate this error entirely. Like all manufacturing error, some will always exist. It is possible to reduce it to an extent that its effect is so minimal that it does not significantly contribute to other errors when the device is in use, though.
How is coning checked?
This is done on all RPI units by conducting test QD12-35. That test is conducted using the procedure below.
Measuring equipment used:
- Precision glass hemisphere
- Mobile Accuscan XE200M-RT
Inspection process for coning
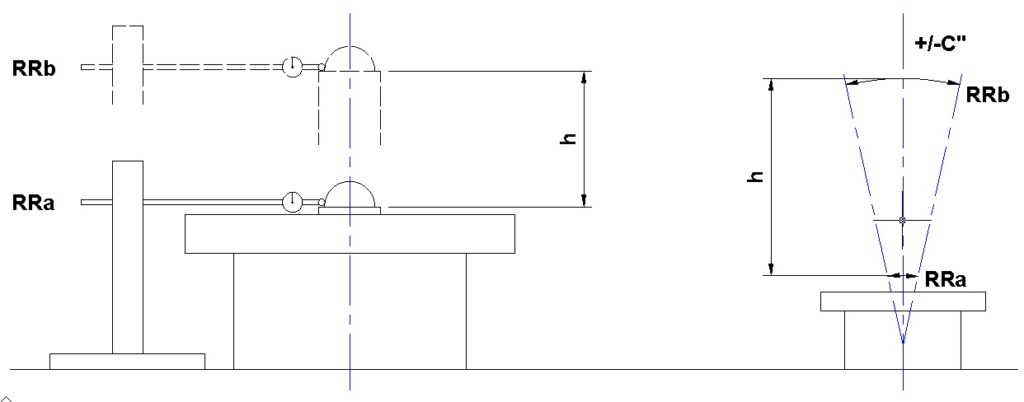
The rotary table is placed on a flat, rigid support surface in the vertical position. Pay careful attention to ensure that the surface conditions it is placed on are suitable to avoid this causing unnecessary contribution to any error. The hemisphere is then centered onto the rotary table.
A high precision linear indicator is placed on the same flat support surface as the table. Again, be careful to ensure correct and stable positioning of the device.
The table is then repeatedly rotated and the axial deviation at the equator of the sphere is measured using the indicator.
After these measurements are collected, the sphere is placed upon a spacer at a set height. The spacer in turn is again mounted at the center of the table. The measurement process above is then repeated.
Using these two sets of measurements, it is possible to determine the coning of the rotary table based upon the height of the spacer. The principle of the test can be seen in the illustration below.

This test is one of 10 chracteristic tests conducted on every new unit supplied, ensuring our devices are the best performing of their type in the world.
Contact us if you’d like to know more about the QA and performance checks that are conducted on our products. We’re always happy to hear from you!
